TL;DR
AI has compressed the time between CVE disclosure and active exploitation from weeks to near real time. Traditional patch cycles and CVSS-based triage can’t keep up anymore — low-severity vulnerabilities are now chainable at machine speed, and a single vulnerable container image across a cluster scales your attack surface horizontally.
What to do about it:
- Know what you have — Generate and sign SBOMs for every image. Maintain a real-time inventory of what’s running where.
- Automate patching in tiers — Fully automate base image updates, gate application dependency updates with tests, and reserve human-in-the-loop only for architectural changes.
- Control what you can’t patch — Strip unnecessary features at build time, isolate vulnerable services with default-deny network policies and L7-aware controls, and deploy runtime detection (Falco, Tetragon) to catch exploitation in progress.
The window between “vulnerable” and “exploited” is gone. Speed, visibility, and layered defense are the only viable response.
Speed matters more than ever
Prior to the availability of tools such as Mythos a widespread assumption was a comfortable baseline: When a CVE dropped, you had days — sometimes weeks — to patch before exploitation began. That window is gone.
The rise of AI-assisted tooling has fundamentally compressed the attack lifecycle. Creating an exploit no longer requires extensive reverse engineering - Exploits are done by AI in a blink of an eye.
Historically, security teams triaged vulnerabilities using CVSS (Common Vulnerability Scoring System) as the primary decision metric but relying on a low CVSS is no longer viable because AI can effortlessly generate and exploit complex execution chains. Since CVSS was design to analyse a single vulnerability in isolation. It does not account for chaining potential.
This becomes lethal - Assume everything is chainable.
Putting it in one sentence:
Fully automated and autonomous attacks in large scale against unpatched services in near real time are the new standard, every one with access to strong LLMs can set them up.
Horizontal movement risk
In a cluster environment this is particularly dangerous. A single vulnerable image, replicated across dozens of nodes, creates an attack surface that scales horizontally. Each node becomes a possible entry point.
Once an attacker compromises one instance, the identical configuration across nodes enables lateral movement. Credentials, environment variables, and access patterns often mirror each other, allowing attackers to pivot easily between containers and potentially reach the entire cluster.
Traditional patch cycles - quarterly maintenance windows, manual approval chains, scheduled rebuilds - are no longer fast enough. You need a system that can detect, assess, and respond - fast.
The inventory: Knowing what you have
The basics are simple: we can’t patch what we can’t see. We need the full picture - complete, real-time visibility into every component running across our infrastructure.
SBOMs are not part of a negotiation
A Software Bill of Material (SBOM) is a detailed and formal inventory of all components, libraries and dependencies used in a software application. SBOMs are crucial to generate transparancy for a software supply chain. It enables us to identify known vulnerabilities inside our systems.
What to generate SBOMs for:
- All container images used in your system
- Build artifacts and binaries
- Infrastructure-as-Code modules (e.g. Terraform, Helm charts)
- Language-specific dependency files and trees (package.json, requirements.txt, go.mod, etc.)
Every image pushed to one of your registries MUST have a SBOM attached, no exceptions!
Also: To avoid tampering and detect alterations of your images and deployments it is advised to sign the SBOMs and verify the signatures.
Tooling examples:
- Syft — Generates SBOMs from container images and filesystems. Outputs in SPDX, CycloneDX, and JSON formats.
- Trivy — Combines SBOM generation with vulnerability scanning in a single workflow.
- Cosign (Sigstore) — Attaches SBOMs as signed artifacts to container images in your registry.
Example workflow:
# Generate an SBOM with Syft
syft myapp:latest -o cyclonedx-json > sbom.json

# Attach it to an image in the registry with Cosign
cosign attach sbom --sbom sbom.json myapp:latest
cosign sign --attachment sbom myapp:latest
Built and maintain a centralized inventory
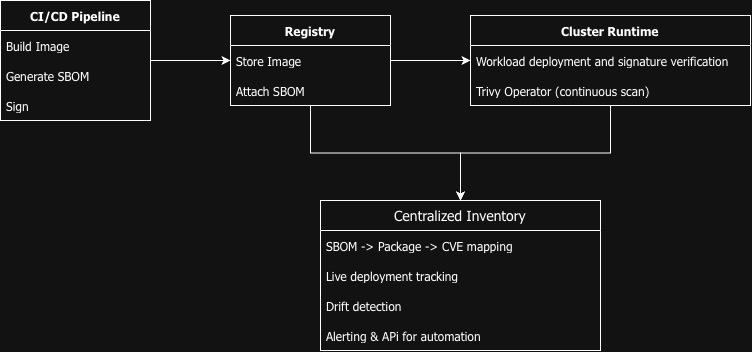
SBOMs are only useful when they can be queried and verified at scale. The central inventory should lay out what is running where. It needs to be a live mapping to your clusters:
| Dimension | What to track |
|---|---|
| Images | Name, tag, digest, registry, SBOM reference |
| Packages | Name, version, ecosystem (npm, pip, apt, etc.), CVE status |
| Deployments | Which images are supposed to be running, on which nodes, in which namespaces |
| Runtime | Actual running containers vs. intended state (drift detection) |
Architecture overview
Response in time: Automated patching
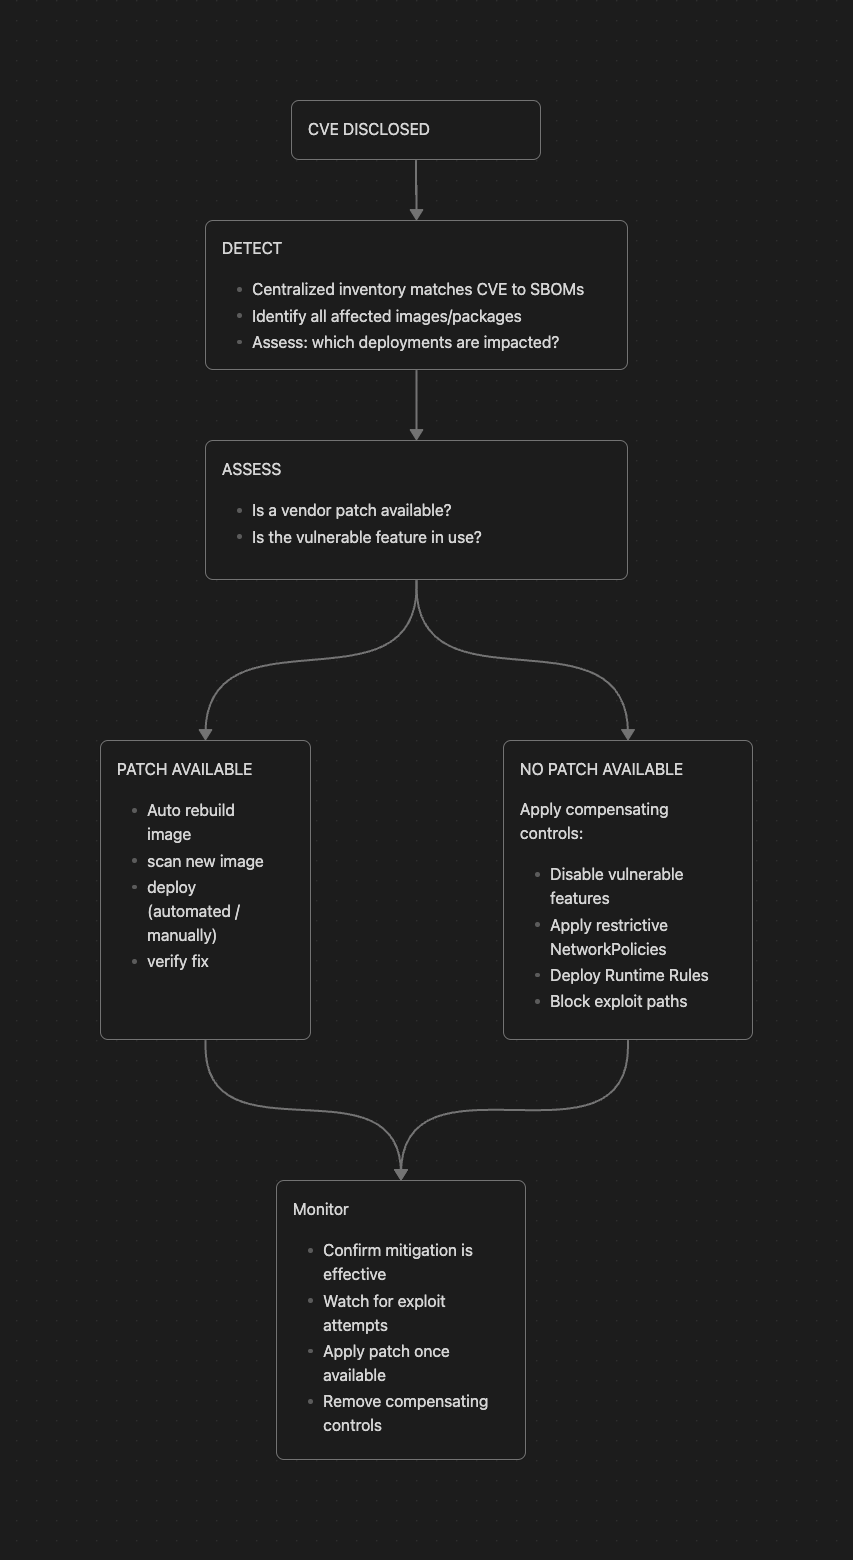
Once visibility is established, we need to automate things. When a CVE is disclosed, the system should be able to take action - without the need of a human overlooking routine tasks. Only complex decisions should be forwarded to the security team.
Automated patch pipeline
The patch pipeline operates in three tiers based on severity and complexity:
Tier 1 — Base image updates (Fully Automated)
When a CVE affects a package in a base image (e.g., a vulnerable openssl version in debian:bookworm), the system should:
- Detect the CVE via continuous SBOM-CVE-monitoring
- Check if a patched version exists in the upstream base image
- Trigger an automated image rebuild using the updated base
- Run security scans on the rebuilt image
- Push the new image to the registry
- Trigger a rolling deployment via GitOps
Tools like Renovate Bot or Dependabot can automate dependency updates in your Dockerfiles and Helm charts. Combined with a GitOps deployment model (ArgoCD, Flux), this creates a fully automated pipeline from CVE detection to deployed fix.
Tier 2 — Application dependency updates (Automated with review gate)
When a CVE affects an application-level dependency (e.g., a vulnerable npm package), the system should:
- Open an automated PR updating the affected dependency
- Run the full test suite
- Run security scans on the resulting image
- Auto-merge if tests pass and the update is a patch/minor version
- Block and alert if it’s a major version bump (potential breaking changes)
Tier 3 — Coordinated response (Human-in-the-Loop with automation assistance)
For critical vulnerabilities that demand architectural changes or impact core services, an AI-assisted workflow can streamline the entire response:
- Alert instantly — Notify security and engineering teams the moment a critical issue is identified
- Map the blast radius — Automatically determine which services, nodes, and namespaces are affected
- Surface remediation paths — Generate context-aware mitigation options based on the current environment and available controls
- Execute on approval — Once confirmed by a human operator, apply the selected mitigation automatically
Control when no patch is available
All of the above assume a vendor patch being in place, but what if this is not the case yet?
This is where most security concepts fall short.
The answer is control what you cannot patch - apply compensating controls. This means to apply temporary measures that reduce or eliminate the exploitability of the vulnerability until a proper patch is available.
Strategy 1: Disable vulnerable features inside the container
Many CVEs affect specific features or components that your application may not actually use. If the vulnerable code is not required, you can disable it.
Strip unnecessary packages at build time. A leaner image means a smaller attack surface. Multi-stage builds help here. An example might be:
# Build stage
FROM golang:1.22 AS builder

WORKDIR /app
COPY . .
RUN CGO_ENABLED=0 GOOS=linux go build -o server -ldflags="-s -w" .

# Final stage — truly empty base
FROM scratch

# Copy CA certs so HTTPS works (optional but common)
COPY --from=builder /etc/ssl/certs/ca-certificates.crt /etc/ssl/certs/

# Copy the compiled binary
COPY --from=builder /app/server /server

EXPOSE 8080
ENTRYPOINT ["/server"]
Disable specific protocols or features at runtime. For example, if a TLS 1.1 vulnerability exists, disable it at the JVM level:
java -Djdk.tls.client.protocols=TLSv1.2,TLSv1.3 \
     -Djdk.tls.server.protocols=TLSv1.2,TLSv1.3 \
     -jar application.jar
Remove or disable unused modules. Some frameworks allow granular control over loaded modules. If the CVE affects an optional XML parser or serialization library that your service doesn’t expose, remove it or disable it via configuration (avoidable by the former concept of lean image creation).
Strategy 2: Network-Level isolation and microsegmentation
When you discover a vulnerable service but cannot immediately patch it — perhaps it’s a legacy dependency, a vendor-supplied component with no fix yet, or patching requires a maintenance window — your next best option is containment. Rather than fixing the vulnerability, you shrink the paths an attacker can take to reach it - treat the component as compromised.
Think of it as putting a vulnerable service in a sealed room: the flaw still exists, but nobody can get close enough to exploit it and spread horizontally.
Kubernetes NetworkPolicies — enforce default-deny:
apiVersion: networking.k8s.io/v1
kind: NetworkPolicy
metadata:
  name: default-deny-ingress
  namespace: production
spec:
  podSelector: {}
  policyTypes:
    - Ingress
---
apiVersion: networking.k8s.io/v1
kind: NetworkPolicy
metadata:
  name: allow-api-to-vulnerable-service
  namespace: production
spec:
  podSelector:
    matchLabels:
      app: vulnerable-service
  policyTypes:
    - Ingress
  ingress:
    - from:
        - podSelector:
            matchLabels:
              app: api-gateway
      ports:
        - protocol: TCP
          port: 8080
This applies a restrictive NetworkPolicy that blocks almost all external access to the vulnerable pod, allows only internal traffic from explicitly whitelisted services.
By using a service mesh, you gain even finer-grained, L7-aware control:
- Istio AuthorizationPolicy — Block specific HTTP paths, methods, or headers that trigger the vulnerability
- Cilium Network Policies — Layer 7 aware policies that can inspect HTTP traffic and drop malicious requests at the kernel level via eBPF
Here is a basic Cilium example:
apiVersion: cilium.io/v2
kind: CiliumNetworkPolicy
metadata:
  name: allow-http-to-api
  namespace: production
spec:
  endpointSelector:
    matchLabels:
      app: api-server
  ingress:
    - fromEndpoints:
        - matchLabels:
            role: frontend
      toPorts:
        - ports:
            - port: "80"
              protocol: TCP
          rules:
            http:
              - path: "/api/v1/users"
                method: GET
              - path: "/api/v1/products"
                method: GET
To block certain paths we could use this example:
apiVersion: cilium.io/v2
kind: CiliumNetworkPolicy
metadata:
  name: block-dangerous-paths
  namespace: production
spec:
  endpointSelector:
    matchLabels:
      app: api-server
  ingress:
    - fromEndpoints:
        - matchLabels:
            role: frontend
      toPorts:
        - ports:
            - port: "8080"
              protocol: TCP
          rules:
            http:
              # Deny administrative paths
              - path: "/admin"
                method: "*"
              - path: "/debug/pprof"
                method: "*"
              # Block SQL injection attempts in paths
              - path: "*/%27*"
                method: "*"
              - path: "*/UNION*"
                method: "*"
Or even HTTP-Header based:
apiVersion: cilium.io/v2
kind: CiliumNetworkPolicy
metadata:
  name: jwt-header-validation
  namespace: secure-app
spec:
  endpointSelector:
    matchLabels:
      app: protected-api
  ingress:
    - fromEndpoints:
        - matchLabels:
            role: authenticated-client
      toPorts:
        - ports:
            - port: "443"
              protocol: TCP
          rules:
            http:
              - path: "/"
                method: "*"
                headerMatch:
                  - name: "Authorization"
                    matchRegex: "^Bearer eyJ[A-Za-z0-9_-]+\\.[A-Za-z0-9_-]+"
                  - name: "X-Request-ID"
                    matchRegex: "^[a-f0-9]{8}-[a-f0-9]{4}-[a-f0-9]{4}-[a-f0-9]{4}-[a-f0-9]{12}$"
Strategy 3: Runtime threat detection
As a final layer of defense, deploy runtime security tools that can detect and block exploitation attempts in real time:
- Falco — Runtime security tool that detects anomalous behavior based on rules. Can alert on shell execution in containers, unexpected network connections, or file access to sensitive paths.
- Tetragon / Cilium (eBPF) — Enforce security policies at the kernel level, blocking suspicious syscalls or network connections in real time without application changes.
Detect exploitation attempt on vulnerable service using falco:
- rule: Unexpected Shell in Vulnerable Container
  desc: Detect shell execution in containers flagged as vulnerable
  condition: >
    spawned_process and container and
    proc.name in (bash, sh, zsh, ash) and
    k8s.ns.name = "production" and
    ka.target.pod.name contains "vulnerable-service"
  output: >
    Shell detected in vulnerable container
    (user=%user.name pod=%k8s.ns.name/%container.name
    command=%proc.cmdline)
  priority: CRITICAL
  tags: [cve_response, container_security]
Putting it all together
Key takeaways
The patch window has collapsed. AI-assisted tooling can generate and deploy exploits in near real time. The comfortable assumption of days or weeks between CVE disclosure and active exploitation is no longer valid. Every team must operate as if exploitation begins the moment a vulnerability is public.
CVSS is a single-data-point metric in a multi-dimensional threat space. A low score doesn’t mean safe — it means exploitable in isolation. AI can chain seemingly unrelated low-severity vulnerabilities into full compromise paths at machine speed. Assume everything is chainable.
Clusters multiply risk horizontally. One vulnerable image across dozens of nodes isn’t one problem — it’s dozens of identical entry points with mirrored credentials and configurations, enabling effortless lateral movement once any single instance is compromised.
You can’t protect what you can’t see. SBOMs for every image — no exceptions — are the foundation. Sign them, attach them to registry artifacts, and maintain a centralized, real-time inventory that maps what’s running where, including drift detection between intended and actual state.
Patch in tiers, automate aggressively. Routine base image updates should be fully automated from CVE detection through GitOps deployment. Application dependency updates should flow through automated PRs with test gates. Only architectural or core-service issues should require human involvement — and even then, AI should pre-map the blast radius and surface remediation options before a human touches anything.
When no patch exists, control what you can. Compensating controls buy time: strip vulnerable features at build time, isolate services with default-deny network policies and L7-aware enforcement (Cilium, Istio), and deploy runtime detection (Falco, Tetragon) to catch exploitation attempts that slip through. But remember — network policies alone can be bypassed through indirect paths like same-node jumphost forwarding. Defense-in-depth with identity verification is essential.
The playbook is layered, not linear. Visibility feeds automation, automation handles the routine, compensating controls cover the gaps, and runtime detection catches what gets through. No single layer is sufficient — the strength comes from the combination and the speed at which each layer can respond.